Automated Data Entry User Form in Excel
Data entry form in excel can save you a lot of time if you know how to create one. In this, step-by-step tutorial, you will learn how to create an automated data entry user form that incorporates a macro with simple VB code. Even if you are a beginner in excel, don’t worry, at the end of this tutorial, you will be surprised to see that you have an automated data entry form in your hand.
Please follow the steps below.
Designing the excel sheets
1. Open your excel and click the file and save as.
2. In the dialog box, using browse, define the path where you want to save your data file. Name your file “Automated Data Entry Form.” Make sure the save as type you selected is “Excel Macro-Enabled Workbook.” Without this, you won’t be able to write a macro.
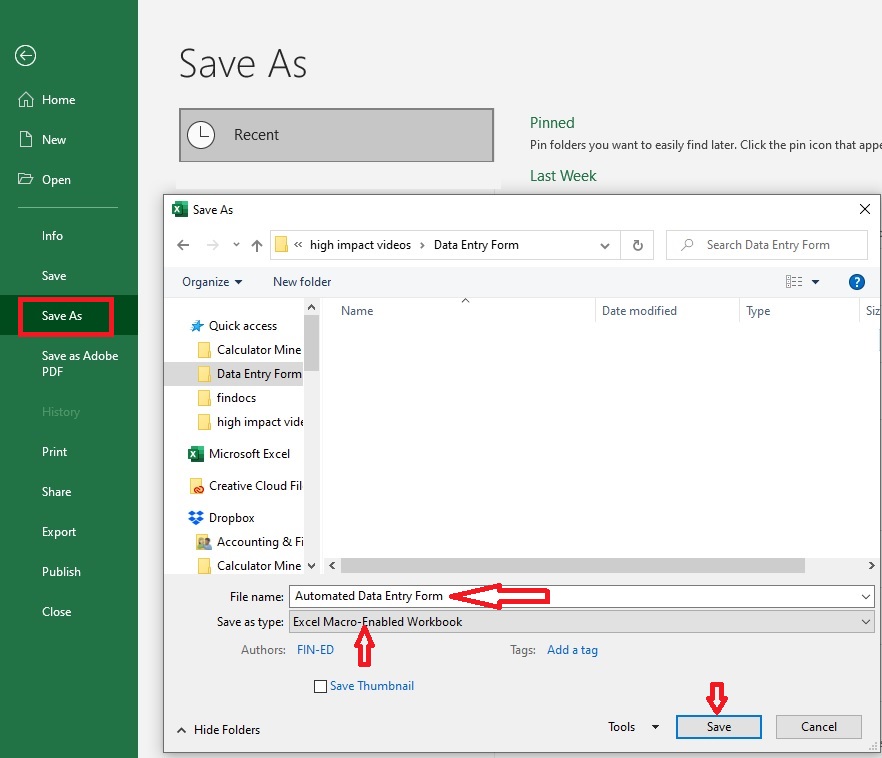
3. Click on Save and see the file name that you selected on top.
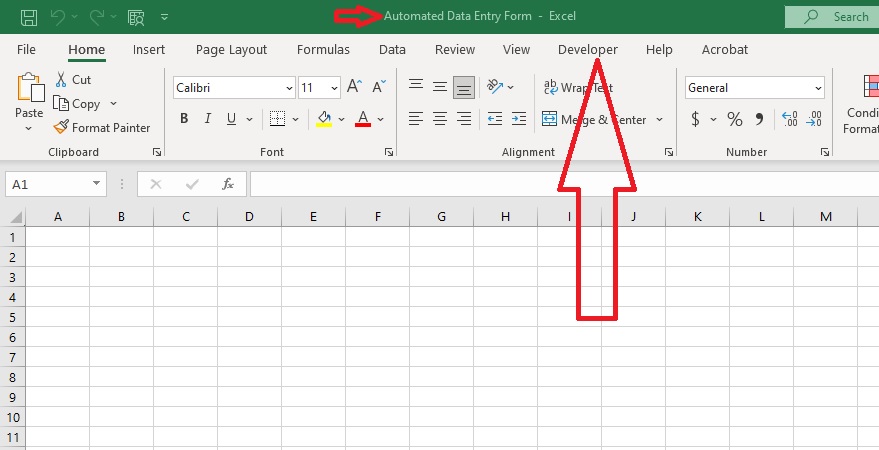
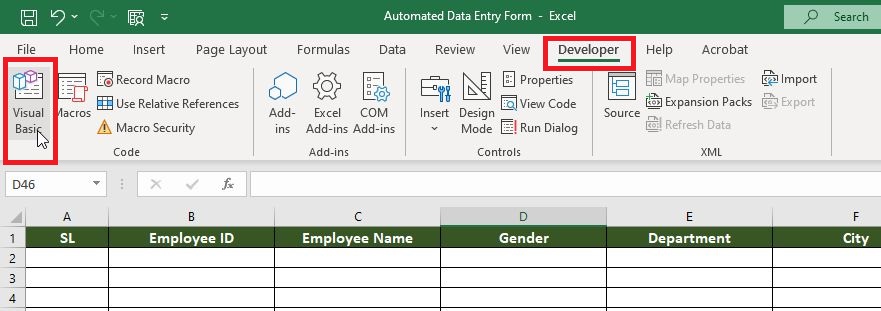
You excel should show the “Developer” tab as above. If it’s not showing, you can Turn on excel Developer Tab by clicking: File=>options=>customize ribbon; Put a tick mark on Developer and click on OK. This will make the developer tab visible on Excel Ribbon.
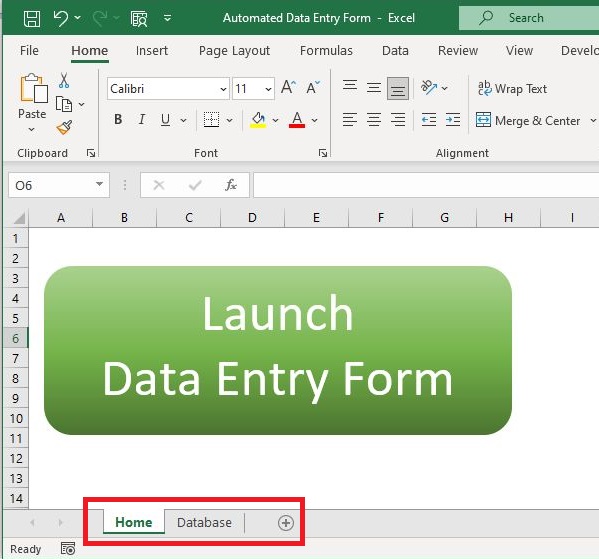
4. Rename the default sheet to “Home.” Click on View and uncheck the gridline.

5. Click on “insert”. Under illustration group, click shape, select rounded rectangle, and drag and draw a rounded rectangle. Shape the rectangle so that it looks like a button. Add text on the button for the user to know what it is going to do. Add one more sheet and name it “Database.”
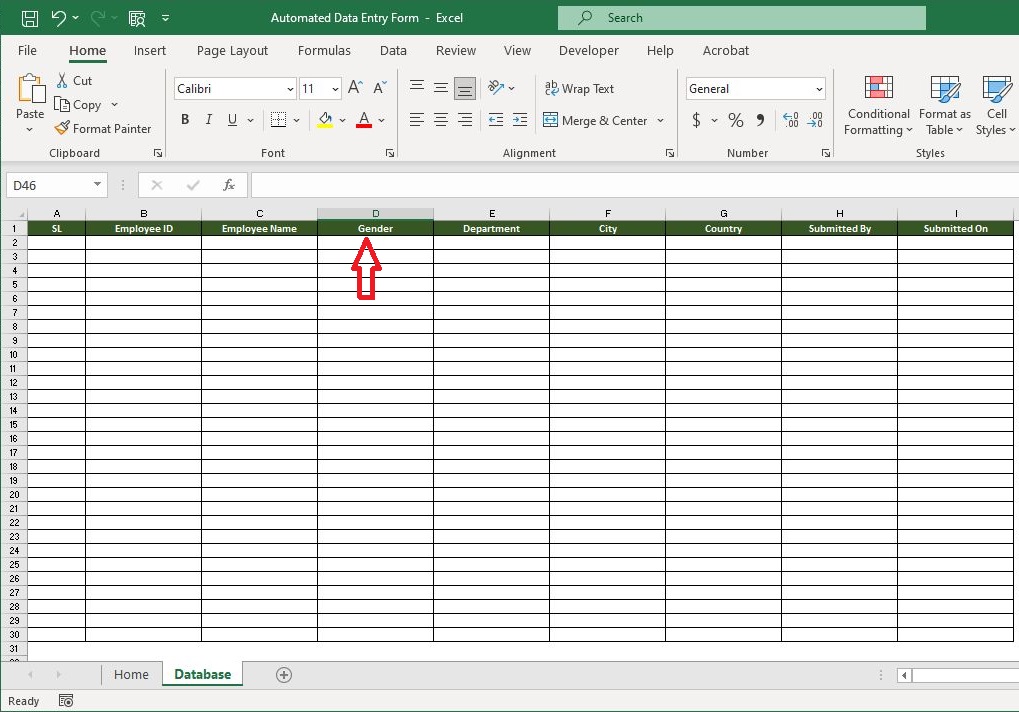
6. Now write the column headers (Sl, EmployeeID, Employee Name, Gender, Department, City, Country, Submitted By, and Submitted On). These column headers are actually variable names. Resize the column headers so that entries are visible in each cell. Select row 1 or column headers and apply some color and text effects. Select the range to show all borders. Uncheck the gridline for the sheet. The sheet will look like below.
Designing the form
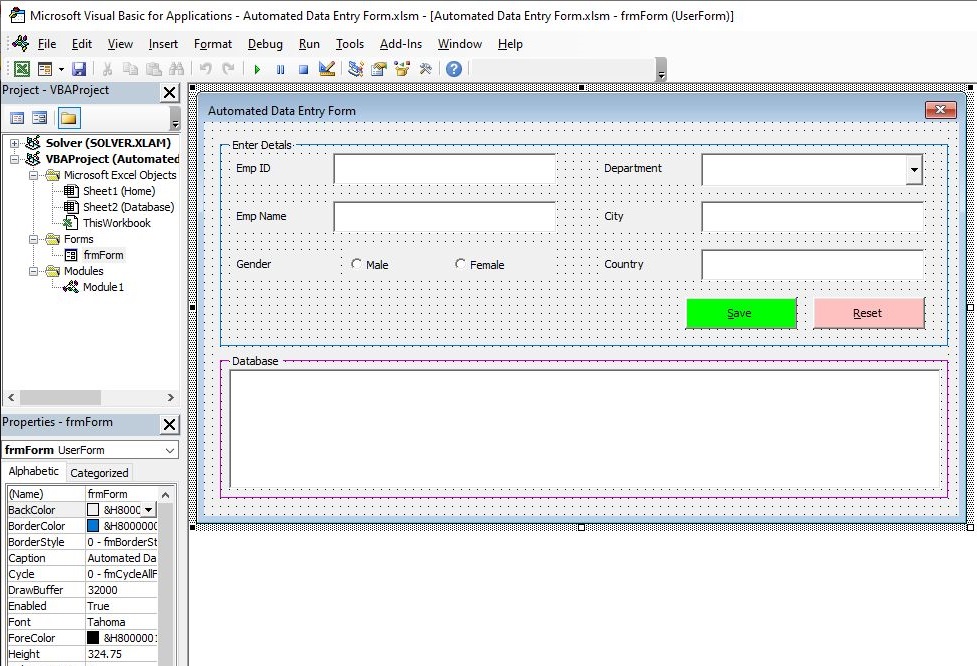
7. Go to the developer tab and click on Visual Basic to open “Microsoft Visual Basic for Applications.”
8. Insert User form (Insert=>userform)
9. From the properties, resize the form to Hight 325 and Width 578; give a name as frmForm; this will be used to write the code; give caption as “Automated Data Entry Form.”

10. Now, from the toolbox, insert a frame. Change the caption to “Enter Details”; change BorderStyle to 1, Border Color to “highlight”;
11. Insert another frame. Change the caption to “Database”, also change the border style and color as you like.
12. Now add 6 labels. You can use Control+C and control+V to copy and paste them. Change the captions for all based on the header name.
13. Add 4 text boxes. Add 2 radio buttons in front of Gender and change captions to Male and Female. Add 1 combo box in front of the Department. Add two command buttons right below the Country text box. Change the caption to Save and Reset. You can also change the color of the buttons.
For the sake of easy coding, we need to name each of the items
For example, select Emp ID textbox, from the properties,
change name to txtID
select emp name textbox, change name to txtName
select male radio button, change name to optMale
select female radio button, change name to optFemale
select department combo boxe, change name to cmbDepartment
select city textbox, change name to txtCity
select country textbox, change name to txtCountry
select command Save, change name to cmdSave and accelerator as s
select command Reset, change name to cmdReset and accelerator as r
Now we can set the tab orders from the properties, so that users can move through the items sequentially when pressing Tab on their keyboards. To do so, we select emp text box first and assign tabindex as 1 from the property. You can do the rest according to your preferred order.
14. Now insert a listbox in the database frame. Change the name to lstDatabase and tabindex as 10, since the last tabindex for Reset was 9.
15. To check what the form looks like, click on the run or hit F5 on your keyboard. As you can see, our form looks nice. But you can always resize or move items in the form according to your liking. The final form will look like below.
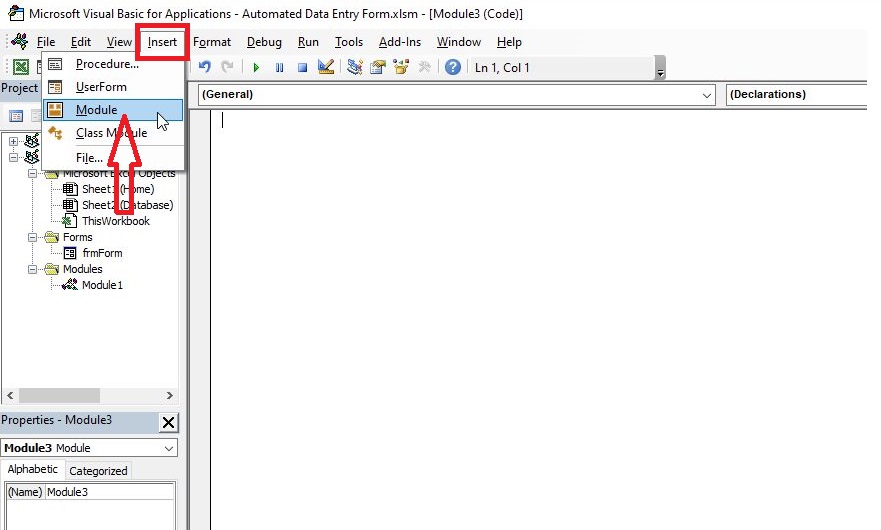
16. Let’s move on to writing the VBA code. Open a module, by clicking insert and module.
Writing VBA code
17. We are going to write three subroutines in this module such as Sub Reset ( ), Sub Submit ( ), and Sub Show_Form ( ). You can simply copy the following code in your module.
Sub reset()
Dim iRow As Long
iRow = [Counta(Database!A:A)] 'identify the last row

With frmForm 'to initialize the form

    .txtID.Value = "" 'this clears the value in empID textbox
    .txtName.Value = ""
    .optMale.Value = False
    .optFemale.Value = False

    .cmbDepartment.Clear 'clear the combo box and assign some value
    .cmbDepartment.AddItem "Finance"
    .cmbDepartment.AddItem "Accounting"
    .cmbDepartment.AddItem "Marketing"
    .cmbDepartment.AddItem "Management"
    .cmbDepartment.AddItem "Production"

    .txtCity.Value = ""
    .txtCountry.Value = ""

    .lstDatabase.ColumnCount = 9 'initialize the listbox; also assign column width
    .lstDatabase.ColumnHeads = True
    .lstDatabase.ColumnWidths = "30,60,75,40,60,45,55,70,70"


    If iRow > 1 Then 'now assgin row source
        .lstDatabase.RowSource = "Database!A2:I" & iRow
   Else
        .lstDatabase.RowSource = "Database!A2:I2"
    End If
End With
End Sub

Sub Submit()

Dim sh As Worksheet 'declare a variable for worksheet
Dim iRow As Long 'to hold the last row, which is blank

Set sh = ThisWorkbook.Sheets("Database") 'assign worksheet to sh variable
iRow = [Counta(Database!A:A)] + 1 'assign last blank row to iRow variable

With sh
    .Cells(iRow, 1) = iRow - 1
    .Cells(iRow, 2) = frmForm.txtID.Value
    .Cells(iRow, 3) = frmForm.txtName.Value
    .Cells(iRow, 4) = IIf(frmForm.optFemale.Value = True, "Female", "Male")
    .Cells(iRow, 5) = frmForm.cmbDepartment.Value
    .Cells(iRow, 6) = frmForm.txtCity.Value
    .Cells(iRow, 7) = frmForm.txtCountry.Value
    .Cells(iRow, 8) = Application.UserName
    .Cells(iRow, 9) = [text(Now(),"DD-MM-YYYY HH:MM:SS")]

End With
End Sub

Sub Show_Form()
    frmForm.Show
End Sub
18. Now, we will call these subroutines from the buttons on the form. To do so, click the form on your left panel and double click “Save” button.

19. Write the following code.
Private Sub cmdReset_Click()
Dim msgValue As VbMsgBoxResult
    msgValue = MsgBox("Do you want to reset the form?", vbYesNo + vbInformation, "Confirmation")

    If msgValue = vbNo Then Exit Sub
    Call reset
End Sub

Private Sub cmdSave_Click()
    Dim msgValue As VbMsgBoxResult
    msgValue = MsgBox("Do you want to save the observation?", vbYesNo + vbInformation, "Confirmation")

    If msgValue = vbNo Then Exit Sub
    Call Submit
    Call reset
End Sub

Private Sub UserForm_Initialize()
    Call reset
End Sub
20. The code will look like below.

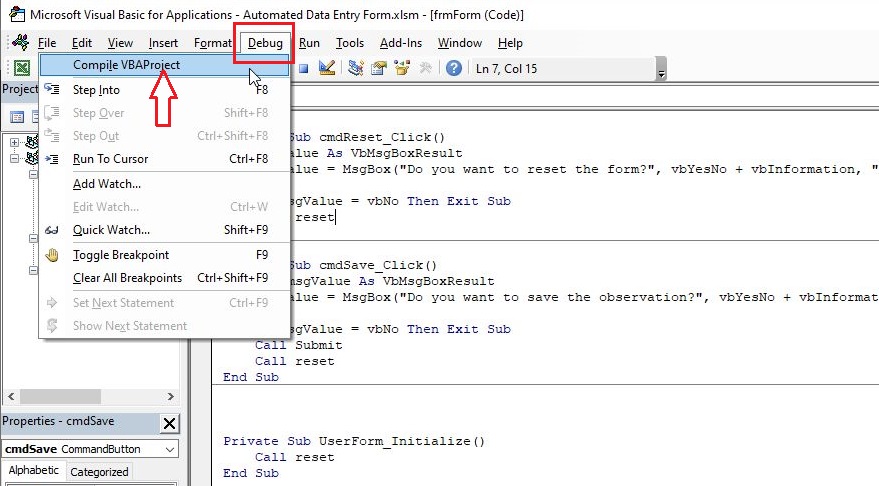
21. Now, save everything and click debug and compile to see if there is any error.
22. Click on the excel icon to go back to the original excel file.

23. From the home tab, right-click on the “launch button” and click “Assign Macro..”
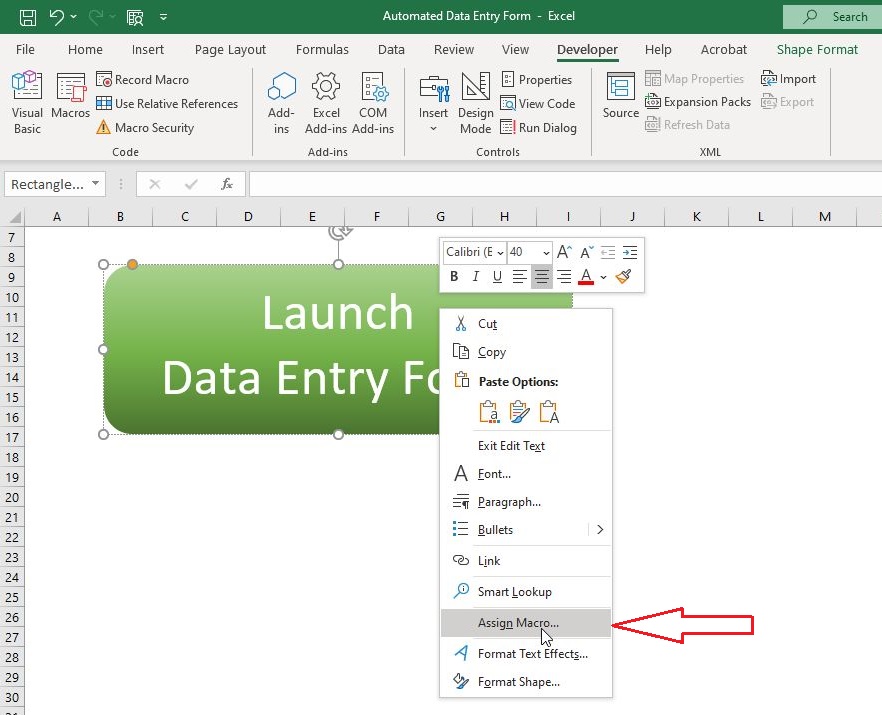
24. Assign the macro named “Show_form” and click Ok.

25. Now click the Launch button and try making some entries. Your final automated data entry screen is given below. You can also see that the entries are also recorded in the “Database” sheet.

You can also download a copy of this data entry form. Please note that you may require 7-zip software to unzip the file.
I hope this exercise was helpful for you. You may want to navigate around the website, which offers a lot of free courses for you to try. Thanks!